A GE dishwasher that’s acting up can turn kitchen cleanup into a frustrating chore. Whether it’s leaving dishes spotted, draining slowly, or flashing an error code, knowing how to troubleshoot common GE dishwasher problems can save money and headaches before calling a repair technician. This guide walks through the most frequent issues homeowners encounter, how to diagnose them, and which fixes are manageable as DIY jobs versus when a professional GE dishwasher repairman becomes necessary. With straightforward steps and clear diagnostics, many GE dishwasher repair issues resolve without a service call.
Key Takeaways
- Common GE dishwasher repair issues like poor drainage, spotty dishes, and leaks often stem from clogged filters, mineral buildup, and worn gaskets—most preventable with monthly cleaning and regular maintenance checks.
- Diagnosing your GE dishwasher starts with checking power, inspecting spray arms for debris, listening for abnormal sounds, and consulting error codes like i20 (water inlet) or i30 (drain pump) to pinpoint the root cause.
- DIY-friendly GE dishwasher repair jobs include cleaning the filter basket, clearing the drain pump intake, replacing the door gasket, and fixing inlet hose leaks—all achievable with basic tools and safety precautions.
- Hard water spotting and cloudy dishes resolve by filling the rinse aid dispenser and using dishwasher-specific water softening salt, which costs under $15 total and works better than vinegar alone.
- Control board failures, motor problems, and heating element replacements require professional technicians—call an expert if you see grinding sounds, encounter error codes i40/F40, or face emergency leaks.
- For dishwashers over 10 years old facing repairs exceeding $800, replacement is often more cost-effective than GE dishwasher repair service.
Understanding Your GE Dishwasher’s Most Common Problems
GE dishwashers rank among the most reliable home appliances, but wear, mineral buildup, and clogged components eventually cause issues. The five most frequent failures homeowners face are poor drainage, incomplete drying, spotty or cloudy dishes, failure to start, and water leaking onto the kitchen floor.
Drainage problems often stem from a clogged pump filter or spray arm blocked by food debris. Dishes not drying properly usually points to a faulty heating element or insufficient rinse aid. Spotting and filming typically result from hard water mineral deposits or low detergent concentration. Leaks can originate from a degraded door gasket, cracked tub, or loose inlet hose connection. Understanding these root causes helps pinpoint whether a quick cleaning or a replacement part will solve the issue.
Many of these problems are preventable with basic maintenance: running a hot rinse cycle monthly with a commercial dishwasher cleaner, checking the filter weekly, and ensuring rinse aid dispenser is filled. These simple habits extend the life of your GE appliance and reduce unexpected repair needs.
How to Diagnose What’s Wrong With Your GE Dishwasher
Before assuming the worst, gather information about what the dishwasher is and isn’t doing. Does it start but not drain? Start and complete a cycle but leave dishes wet? Not start at all? Run through these diagnostic steps in order.
First, check whether the dishwasher is receiving power. Look for a lit control panel and listen for motor sounds during a cycle. If there’s no response at all, flip the kitchen circuit breaker serving the dishwasher off and on: a tripped breaker often solves “no power” issues. Next, open the door mid-cycle (many GE models pause automatically) and inspect the spray arms for debris, mineral buildup, or blocked nozzles. Run your finger along the jets, if they’re rough or clogged, soak the arms in white vinegar for 2–4 hours and use a thin wire to clear each hole.
Listen carefully during operation: abnormal grinding, squealing, or silence where you’d expect motor noise signals mechanical problems. Smell the interior after a cycle, a musty odor often indicates mold or a trapped food particle. Check the bottom of the tub where the filter sits: a visibly dirty filter is your first target for cleaning. Most GE models have a twist-out filter, rotate counterclockwise and rinse thoroughly under running water.
Error Codes and What They Mean
GE dishwashers display error codes on the control panel to pinpoint problems. i20 or F20 indicates a water inlet issue (low water flow, closed supply valve, or kinked hose). Check the shutoff valve under the sink, it should turn on fully. i30 or F30 signals a drain pump failure or clogged drain hose: inspect the drain line behind the dishwasher for kinks or debris. i40 or F40 points to a control board malfunction, usually requiring professional service. i60 or F60 means a door latch problem: ensure the door closes completely and the latch mechanism isn’t bent or broken.
If your GE dishwasher displays a code not listed here, consult the manual (often found online by model number) or the manufacturer’s website. Document the error code before contacting a repair service, technicians use it to expedite diagnostics and order the correct replacement part.
Step-by-Step Repair Solutions for Top Issues
Many common GE dishwasher repair jobs are within reach for someone with basic hand tools and patience. Always disconnect power before opening the appliance, flip the circuit breaker or unplug if accessible.
Fixing Drainage and Leak Problems
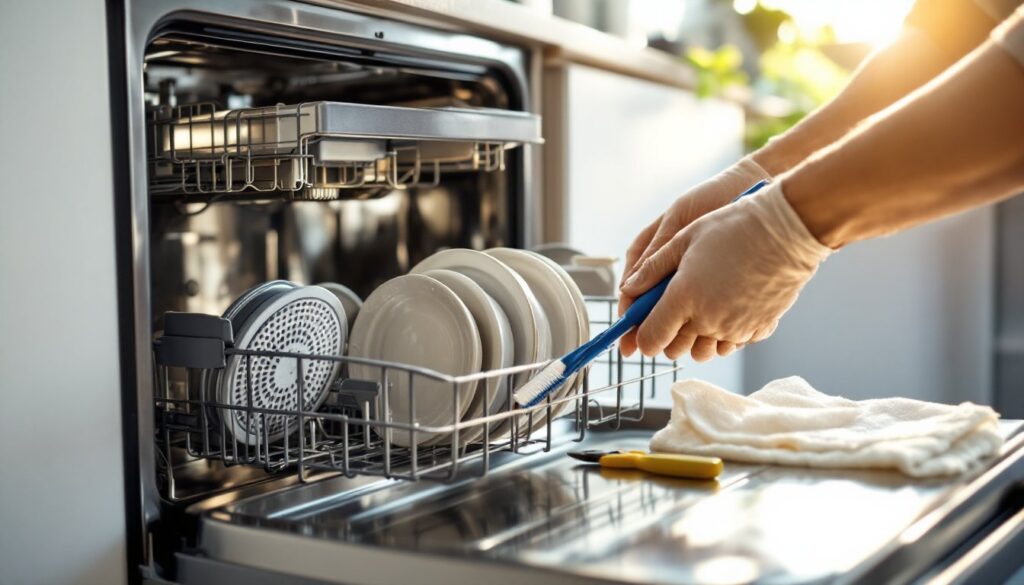
Clearing a clogged drain is the most frequent DIY fix. Access the filter basket at the bottom of the tub (consult your model’s manual for exact location, GE calls it the “wash arm filter” or “fine filter”). Remove food particles, mineral deposits, and debris by rinsing under hot water and using an old toothbrush to scrub the mesh. Reinsert the filter, twisting clockwise until snug.
Next, inspect the drain pump intake (the port where water exits the tub). Food particles often lodge here. Use a flashlight to peer inside: if you see debris, carefully remove it with needle-nose pliers or tweezers, do not force anything. Some models allow access by removing a removable cup or cap.
For water leaks, first check the door gasket, a rubber or silicone seal running around the door perimeter. Open the door fully and inspect for cracks, hardening, or gaps. If it looks worn, the gasket (typically $50–$120 in parts) must be replaced. Close the door and run a short cycle to confirm no water drips from the door edges. If water pools inside the tub rather than draining, the drain hose (located behind the dishwasher) may be kinked. Pull the unit forward slightly (after turning off water and power) and check the hose routing, it should have a gentle downward slope toward the sink drain without sharp bends.
Inlet hose leaks appear as water pooling beneath or behind the dishwasher. Turn off the water supply valve under the sink (turn clockwise), then inspect where the inlet hose connects to the dishwasher and sink supply line. Tighten the threaded fitting by hand first: if leaking persists, turn off power, remove the old hose, and install a replacement stainless-steel mesh inlet hose ($20–$40). Do not reuse the old hose, internal corrosion may have weakened it.
Addressing Cleaning Performance Issues
If dishes emerge spotty or cloudy, the problem is almost always hard water deposits or low rinse aid. Fill the rinse aid dispenser (a small door on the interior wall, typically left side) with commercial rinse aid until full. This costs about $4–$8 per bottle and prevents mineral spots better than vinegar alone. Run one full cycle before expecting improvement.
For persistent spotting, use a water softener salt specifically made for dishwashers (not table salt). Many GE models include a water softening reservoir. Locate it by consulting the manual, then refill with dishwasher salt. Soft water paired with rinse aid eliminates most filming.
Dishes not drying is often a heating element failure. If dishes feel cold at the end of a cycle and wet spots remain, the heating element, which raises water temperature near cycle’s end to aid evaporation, may be defective. Testing and replacing it requires disassembly and is best left to a professional.
When to Call a Professional Technician
Not every issue is a DIY project. Call a professional GE dishwasher repair service or GE refrigerator repair service near you when encountering problems beyond troubleshooting scope.
Control board failures (error codes i40/F40) require specialized diagnostics and replacement, a technician confirms the board is faulty before ordering and installing a new one ($300–$600 plus labor). Motor or pump failures produce grinding or no-start conditions and can’t be reliably tested at home without meters or specialized tools. Heating element replacement involves disassembling panels and electrical connections: improper work risks shock or damage to the control system.
If your dishwasher is still under warranty, contact GE customer service or your retailer, professional repair is often covered. For out-of-warranty units, get quotes from at least two local technicians before committing. Some GE profile dishwasher repair shops offer flat diagnostic fees ($75–$150) that credit toward repair costs if you proceed. Compare repair costs against replacement: a dishwasher over 10 years old approaching $800 in repairs is often worth replacing with a new unit.
Emergency leaks pooling water on the floor require immediate attention: shut off the water supply valve and pull the dishwasher away from the counter to stop water from entering cabinets. Call a technician within 24 hours to prevent mold and structural damage.